Showing posts with label Electrical. Show all posts

Wednesday, February 6, 2013

Let There be HEAT!

We're about to begin the process of replacing the heater.  As usual, nothing's ever easy.  Luckily, a friend's husband does HVAC (Airflow Pros in SF), so we have some assistance with making the right decisions.

We're going with a Trane machine, based on his recommendation over Bryant's.  He said he has more service calls for Bryant's and finds the Tranes to be more reliable.

To get things up to code (gotta love SF), we need to put the furnaces on their own breakers (so we need an electrician), we have to T off the gas line to the water heater and furnace (it currently daisy chains from the main to the water heater to the furnace), we have to vent out into an open area (roof top), and we need to find somewhere for the condensation to possibly drip.  The biggest thing is that we also have to abate the asbestos lined ducts that are currently in place.

Another decision that we had to make was whether or not we wanted acoustic lined air base.  Make it quieter?  For sure!  Hopefully it doesn't get too overcomplicated. 

By the end of next week, we could have a functioning heater! 

Friday, June 18, 2010

Kitchen Wall Socket

Remember the random wires sticking out of the rear wall in the kitchen?  I thought about it, and I need those to power the microwave!  The problem is, though, that I can't just connect the microwave to loose wires.  I need an outlet.

Chuy asked what I was planning on doing about that whole situation.  I told him I was thinking of using those wires to put up an outlet.  He said it'd be pretty simple to do, and we started working on it.

His son, Danny, was there, too.  He made me some drawings.  I'll have to hang them in the house eventually!

We had to cut a hole in the wall where the wires came from the existing outlet.  As with everything else, it wasn't as easy as it initially seemed.

We cut the hole in the wall where the new outlet was going to be.  We pulled out the old wire, only to find that there was a small hole in a diagonal cross braces that it went through to get up to where it was.  Moving the wire through it was proving pretty difficult.  With a whole lot of stabbing in the dark, we got it.

Here's the finished product, taken a few days later.

Garbage Disposal Switch


Chuy, my Obi Wan Kenobi of house work, came through once again!  He noticed that I had the garbage disposal hooked up, but no switch for the outlet, so he installed one!

Sunday, June 13, 2010

Garbage Disposal Installation

I unboxed the garbage disposal today.  It was a late start to the day, since we were at the Giants game this morning.  We had picked up a switch and the power cord from Home Depot the other day, so I had all the parts for the installation.  Here we go!


I had to open up the bottom part of the disposal unit.  It's easy, since there's only one phillips head screw holding it shut.

The cord clamp thing screwed in pretty easily.  So far, this has been pretty similar to the dishwasher power cord installation.

The wires in play:

I pushed the wires through the clamp, connected them with the wire nuts, grounded the green wire, then tightened the clamp.

The garbage disposal was pretty easy to put up after that.  Just push up and turn.  It all locked into place relatively easily.  It makes me think it was possibly too easy.

I don't know if you can tell from this picture, but we have a few new problems here.  First, if I plug in the disposal, it's on.  There' no switch on it to control it.  Next, the outgoing drain pipe in the wall is HIGHER than the disposal's waste pipe.  This is going to be a problem, since it'll cause all the water to back up into the disposal.  


Tuesday, May 25, 2010

Trip to Home Depot

Another rainy day in SF means we cannot paint!  We're skipping the house altogether, and heading straight to Home Depot.  The President's in SF, and traffic is miserable.  It took us way too long to get anywhere.

Items on the list from Home Depot were light switches (rockers) for all the rooms, a light switch for the bathroom vanity, a GFI for the vanity, light bulbs for the vanity, and faceplates for all of these.


The electricians changed the box to a dual gang box, so I needed a dual outlet GFI and a stand alone switch.  There were switches with night lights in them which would've looked cool, but it could also be really annoying down the line.  In looking at the light switches here, we noticed just how many there were!  I mean, crap, different colors, different uses, different configurations, timers, button timers, light sensitive, dimmers, rockers with dimmers, switches with dimmers, knobs, etc!  Nothing these days is simple!  All I wanted were white rocker switches.  A single one was $2.49.  We needed one for the front bedroom, the kitchen, the laundry room, the back bedroom needed two, and two for the bathroom - 7 total.  At $2.49, that would've costed a little over $17!  For light switches!  I noticed the "Contractor Pack" of switches for $12 for ten of the same switches.  We got ten instead of just seven.  Maybe we can even swap out the living room switch, too!  The faceplates were the same deal.  Ten was cheaper than 7 individually, even with the separate dual gang one.

GFI's were just as complicated.  There were 15 amp ones, 20 amp ones, red and black switches, all white switches, safety GFI's, etc.  We got the 15 amp all white safety GFI.


Next was the light bulb.  The fixture needs 40 watt candelabra's.  Simple, right?  Wrong.  What size bottom did I need for the bulb?!  Aren't they all the same?


Nope!  There are the small bases and the big bases, frosted and unfrosted, too!  Great.  Time to get what I can and head out.  I have to remember to look at the fixture to see what size I need.

We also looked at ceiling fans for the front bedroom.  Nothing really impressed us.  I want to ask Chris which one he got.  I remember him doing quite a bit of research before purchasing his.

Monday, May 24, 2010

Bathroom Stuff

I also finished painting the bathroom! I removed the bathroom door, so it'd be easier to paint.  After removing all the fixtures attached to it, I realized that we needed to sand it down and fill the holes.  Due to the other things we needed to do today, I decided to hold off on that stuff.  

I looked at the electrical for the light switch and the GFI in the bathroom as well.  I have no idea how to hook up any of these things!  I'll need a switch at the bottom plus a GFI.  It's in a dual gain box, so I might just get a switch and a single GFI (I could get a dual if I wanted).  I want to get a brushed nickel faceplate for it, too.  HAHAHHA!  Everything in the bathroom's going to be burshed nickel!  Plain, plastic white would suffice as well, though.  


I wonder if a dual GFI is even necessary.  What more could get plugged in that a shaver?  Oh, wait, nevermind... electric toothbrush, blow dryer, straightener... all the girl stuff! HAHAHAHA!


This looks clean.  Too bad it's $16.50!  I'm going to see if HD has it for less.  Geez.  I feel like I could cut one with a jig saw for less!  

Thursday, April 1, 2010

Flippin Switches!

Somebody please remind Sandra to remind me that if I think something's going to be simple, but I've never actually done it before, we're looking at 2 hours, not 15 minutes!

The plate of switches in the hallway controls the porch light (left), doorway light (center), and hallway light (right). All of them down means they're all off. All of them up means they're all on. The problem is that the doorway light is a three way switch that has the motion sensor on the bottom. If the top switch is off, then the auto feature of the motion sensor doesn't work. So, I decided to turn the center switch upside down! Simple, right?

I removed the wall plate, noticed that the right screws were a bit tight. Odd, but kept going. I unscrewed the center switch, rotated it 90 degrees, and the light turned off! Crap! Was it the wiring? I checked the wires, and they were all secured. After rotating it back and forth a few times, I think there's got to be something inside the switch which keeps it from working when upside down. Like a mercury sensor or something. But, from all my twisting, one of the old wires cracked! Great. I had to unscrew the connection, strip the wire, then reconnect it. Not bad, but I didn't feel like removing the other switch (right). I reconnected it, rotated the center switch, and the left side wire snapped! This kept happening until some of the wiring was too short to be used! I ended up replacing the two connecting wires (they ran power into the other two switches) as well as using a new three way switch for the center. I installed it as needed (on is down, off is up). Perfect.

Now to screw everything back in place... In trying to put everything back, I found that some of the screws were stripped and had to be replaced. Good thing there was a bucket of electrical stuff in the garage! I salvaged some screws from there, and put everything back into the wall. As I secured the plate, I discovered something else! The switches weren't even! I had to screw in the bottom right first, then top left to get everything askew in just the right way, so I could secure the wall plate. 2 hours down, and finally it all works. Time to go to Target!

Sunday, February 21, 2010

Moving the Coaxial Cable

For some reason, the coaxial cables for the cable are all coming out of the floor boards.


I had this bright idea to cut a hole in the wall, drill a hole in the floor, then move the cable into the wall, so it's got a socket! Great idea, right!? Well while cutting the hole in the wall, I cut a power cord. Time to call Harry!

Saturday, February 20, 2010

Put Up the New Chandelier

That old, ugly, 70's, hanging chandelier was getting on my nerves. The new one had been painted and was ready to put up. We picked up the $4 mounting kit from Home Depot, and we were ready to go! Taking down the old one was really easy; figuring out how the new one has to get mounted wasn't so easy. Thanks to Sandra and her shoulder muscles, we got this thing up and secured. It looks great, don't you think!?

The old one's hanging in the middle back there:


Here's the new one, without the lights on:


And with the lights on:

Monday, February 15, 2010

Dimmer Switches for the Living Room!

Having the recessed lights in the living room is cool. Having them on two separate switches is cool as well. Being able to dim them would be infinitely more cool! So, Sandra and I went to Lowe's and picked out the best looking dimmer. The ones at Home Depot were full of fail. These had sliding dimmer switches, plus an On/Off button on the bottom. Single Pole - Check. HAHAHAHA!

Here's the current wiring configuration of the switches.


I basically connected the two dimmers to each other to match that configuration, then connected them to the power, put them up, and voila!


I'm not going to lie; it wasn't perfect. I couldn't find a faceplate to cover all three switches with this configuration, so I had to buy one of those make your own faceplate dealies. It actually worked, and it'd be perfect if the wall was level!

Also, the two dimmer switches had a lot of metal along the edges that kept them from fitting in the box together. I used a pair of pliers and bent the edges backwards to get it to fit cleanly. You really can't tell.

All lights on:


Rear light dim, fireplace lights on:

Saturday, January 30, 2010

The Changing Chandelier

Granted the new chandelier doesn't really look like anything spectacular, I still thought it'd be better to un-shine it before hanging it. Sandra and I looked at metal paints to try to figure out what to use. Here's how it looked before we started:


We picked up a can of Knocked Brown metal spray paint. We were worried that the paint wouldn't stick to the light at all, but it did with some difficulty. Sandra spray painted while I was working on something else. It was clear after one coat that a second would be required. Here's what it looked like after one coat:

You can't tell at all from the picture, but specks of gold were still showing through the brown. One more coat will be necessary.

Wednesday, January 27, 2010

lights, Lights, LIGHTS!

I guess there's pretty much a something out there for everything and everyone, huh? It's so hard to decide on light fixtures.

I have to get lights for the backyard, since right now it's just dark at night. I can't believe there were never any lights installed back there! The decision, as seems to be normal, includes a menagerie of factors seemingly unrelated to just having a light there.

Factors:
  1. Color or the fixture
  2. Wattage of the lights
  3. Height of the fixture
  4. Motion Sensor or not
  5. Where to place the switch? (Kitchen or back room)
  6. What brand of light to get?
  7. What do the reviews say on the light?
  8. If it's a motion sensor light, should the motion sensor override the "Off" position of the switch?
  9. If it's a motion sensor light, should the "On" position of the switch override the timer?
  10. How much are replacement bulbs?
  11. How often do the bulbs blow out?
  12. What's the coverage area of the motion sensor? (150, 180, 220, or 270 degrees)
  13. How accurately can you set the sensitivity of the motion sensor?
A trip to Universal Lighting was all kinds of no help. They have no prices listed on their products, and it's impossible to get someone to help you. Apparently, you have to be a contractor to get taken care of . We finally took some items to the front desk and got a price check. We thought one of the lights was cheaper at Home Depot, so we decided to go check it out over there. It turned out not to be cheaper, so we're making another trip to Universal Lighting today. Harry from Hai Lin Electric is supposed to meet us there, so we can get his advise on things.

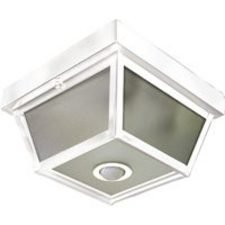
We want to get a motion sensor light for the from foyer, between the gate and the doors. We found one at Universal Lighting that they're selling for $50.
Amazon has the same light for $35. We're going to order from Amazon.

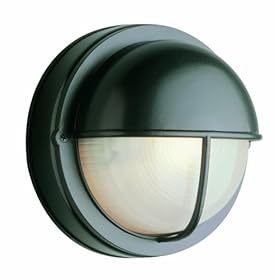
The front of the house is also really dark at night. We considered placing one flood light above the garage, but we decided that it would look really ugly. Two smaller lights on the sides of the garage would be more aesthetically pleasing, so we're also looking for lights to put there.

I found these two on Amazon:
I like this one better

This one would serve its function, and it's $7 cheaper.


As with everything else, we'll go back to Universal Electric to check out what they have and price check. If we can get something that doesn't need to be shipped, then that's better.

Tuesday, January 26, 2010

What A Difference!

The recessed lights got installed yesterday. They look awesome! The Post-It room diagram, along with post-its on the ceiling really helped. Thanks to Yelp and Harry Lin with Hai Lin Electric. These guys did a great job! They kept the mess to a minimum, and made as few and small holes in the walls as possible. I'll be able to patch up the holes without much trouble!

From the Hallway:

Before:
After:

This one really shows how well the spacing of the lights illuminates the room since it was dark out.


From the Dining Room:

This one shows the pattern we decided on. It really matches the drawing!

Sunday, January 24, 2010

What's the Circumference of the Penumbra of the Recessed Lights?

Geez, I wished I had asked that last Friday! The electricians were coming in tomorrow to install the recessed lights. I'm supposed to mark the spaces on the ceiling where the lights are to be installed, or leave a map for them. Sandra and I literally spent two hours sticking
and resticking post-it's to the ceiling to see what the light pattern would look like.

The things we were considering were:
How would the set-up look overall?
Would it provide enough light for the room as a whole?
Would it provide enough light to each section of the room?
Is it functional to place a light there?
Is it aesthetically pleasing to place a light there?
Should they all line up a certain way?
How far from the wall should they be?
How far from each other should they be?
The ceiling's 10' high. What would be the umbra and penumbra of the lighting cone from that distance?
Where should the switch be? Should the switches both have dimmers?
Is it necessary to have three switches - one for one of the outlets?
Based on the dimensions of the room, if we placed them evenly into two rows of three, how would it look?
Should each pair (front and back of the room) be on the same plane?
Should each set of three (front three, back three) be on the same plane?

Sandra diligently helped me take notes as I read off measurements, and in the end, here's what we got:


There's about 72" between the front row and the back row.

We left that Post-It, along with 6 on the ceiling where each light should be for the electricians. Each Post-It on the ceiling had the distance to either side (wall or light) with arrows pointing out the direction. I really hope it's clear enough for them! They're supposed to be in tomorrow. I'll stop by after work to check it out!

"Space By The Lamp!"

Only my sisters will understand that the title of this post relates to the heater. My mom's house has a heating vent in the living room by the lamp, and every time it was turning on, someone would call it, so they could lay by it and warm up.

A few weeks ago, we walked into my house and noticed it was REALLY hot in there. It seemed like the heater had been left on all day! I looked at the thermostat, and it should have been off, but it was on. Odd. I contacted the contractor, and he said he didn't have the heater on at all, but would come by to check on things to make sure nothing was wrong.

The next day, he told me it was broken (duh). I disconnected it from the wall, and patched up the giant hole. The two black and black wires still stuck out.

On a trip to Home Depot, I decided to pick up a thermostat. There are a TON of thermostats! 5 and 2 days, 5-1-1 days, 7 days, with an atomic clock, with the outside temperature, lighted, digital, old school (twist), etc. They ranged from $20 to $90. I decided to get something simple and cheap. The $30 Honeywell looked fine.


It was digital, programmable, and didn't seem to be too complicated. I took it home, opened it up, and there were FIVE slots for wires! I guess because this also worked for places with air conditioners, it had hot and cold settings. What made things even more complicated, my old thermostat was labeled Y and O. This one had a Y, but no O. It had an Rc, Rh, W, Y, and C. The Rc and Rh were connected by a jumper. Why? The instructions didn't elaborate. I tried hot tapping them, but because the voltage was so low, there was no immediate reaction! Great. I decided to leave it alone until I could drill the holes necessary to mount the thermostat.

My Uncle came over today with a concrete drill for the plaster. We marked the holes, drilled them in, and mounted the thermostat. Oops. I forgot to look up the wiring! We tried a few things, none of it worked. Googling on our phones was difficult to read, so we just left to go eat. I looked it up on-line at my mom's house, and found this blog. R and W were the wires I needed to connect, he said.

I drove over to the house, connected the R and W, closed up the unit, and turned on the heat. Within seconds, the heater turned on!

Saturday, January 16, 2010

Let There Be Light! (Part 3)

After some Googling, I found that there are no dual pole, 3-way switches made by that company! Some are advertised as such, but Amazon reviews have said that there are only three wires +, -, and Ground. The real 3-way, dual pole switches would require two travelers, the hot, and the ground.

I called Lowe's, and the person I spoke with on the phone said they did have some 3-way, dual pole motion sensor light switches. I mentioned that I had purchased the single pole one, and she said, "That happens all the time. You can return it after you install the right now, if you want." Cool, I thought, then headed out to Lowe's. They didn't have the correct switch on the shelves where everything was, so I asked one of the employees. He walked off with the one I had picked up off the shelf to look into it. About five minutes later, he returned with, "I don't think we carry it." Great. I just drove out here for nothing!

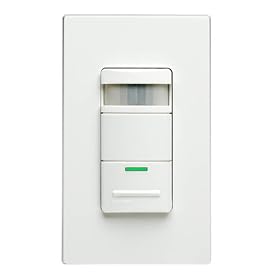
On the way back to SF, we stopped at Home Depot, cuz that's how we do. Home Depot did have a 3-way, dual pole motion sensor light switch. It was made by Leviton.

I asked the employee behind me if I could open it up, and he said, "Go ahead." It was exactly what I needed! It had two travelers, the hot, and a ground! Oddly enough, though, it didn't come with a plate. So, me being me, I didn't buy it. I figured I could find one with a plate on Amazon.

Sandra talked some sense into me that night, and I went back Saturday to pick it up. Installation took about 15 minutes, since I was playing with the travelers to make sure the upstairs light switch would be on in the up position (and off in the down position), and that both switches would work. The instructions look like this, so I just decided to hot tap the wires, since they are all black! What's weird, though, is that the upstairs switch won't turn the light on if the downstairs switch is in the off position. It seems like this wasn't ever wired correctly in the first place! It works. Upstairs will be on, downstairs will be on Auto, and the light will turn on when the door opens, and off 5 minutes after no one walks by.

Open the door, and Let there be light!

Monday, January 11, 2010

Let There Be Light (Part 2)

I noticed that when I get to the house at night, I'm always smacking the wall to find the light switch. Why can't there be something that just turns on when I open the door? Zing! Rewind to last Friday's trip to Lowe's to price check tiles and shower head sets. We're walking down the electrical aisle, and I see light switches. I know I have to change a few of them (they dim on their own when you hit the wall), but could I replace the entryway switch with a motion detector switch?

As usual, things aren't easy. They have motion detector switches that have On, Off, and Auto settings, switches with no settings, switches with auto and off, switches that cover 180 degrees and some that cover 150 degrees. Then, they all come in white and "neutral." I'm walking down the aisle to see what else there is in this style, and I see some three-way switches. "These two way switches are monogamous, I thought, and these three way swiches, 'Get down!' What's the difference? How can a switch go three ways? On and off, right?" Without asking, I get the two way switch (single pole). The one shown below is a three way switch.


We get to the house, eat, unload everything, and I start pulling off the old switch. The breaker's off for the front, and as I unscrew it all off, I realize how dark it is! I couldn't read the back of the switch to tell what was positive, negative, or ground. Oh well, I'll come back on Sunday to finish.

Sunday, we arrive, and Serge, P, and Natalie are over to help, too. P's checking out the back of the switch, and it doesn't specify what's positive, negative, or ground. It just has a common label on one side. And, all the wires are a solid black!

Apparently, this is how three way switches are:


We tried connecting the ground to the common, then the other two black ones randomly, hit the breaker - nothing. Swapped the black ones - nothing. Swapped them again - nothing. Great. This time, I disconnected everything and hit the breaker. Holding the two black wires, I tapped the black wires coming from the wall. Top two - nothing. Left top, bottom - zzzzzzzzzzzzttt!! Light turned on! Right top, bottom - zzzzzzzzttt!! Light turned on! Wtf? They both do it. So I connected the ground to the top left, then the black, one to the top right and the bottom. Everything worked fine (on this switch!). I put all the wires back into the wall, screwed it shut, tested it out, and it worked! Sweeeeeet! The instructions say to connect the ground to the mounting plate - why?

I got back home and googled the instalation of a motion sensor. Let's just say It's wrong, even though it works, and I now know what a three way switch is for! We'll be revisiting this once I exchange the switch for a three way!

Sunday, January 10, 2010

Let There Be Light!

I went to the house last night to cap off the grounded traveler wire. It went fine. From everything I could find, no one really makes a legit 3-way motion sensor switch that has two travelers, a common, and a ground! Seems like there would be a huge market for this item, since a lot of people on-line are looking for one.

For now, the bottom switch, while set to auto, will turn on when the door's opened, or when someone walks down the stairs, and when the switch is set to, "On." It'll also turn off the light if the upstairs switch is set to, "On."

The top switch will turn off the light if it is set to on, but it will not turn it on if it is set to off. It will turn it on if it's set to, "auto," though.

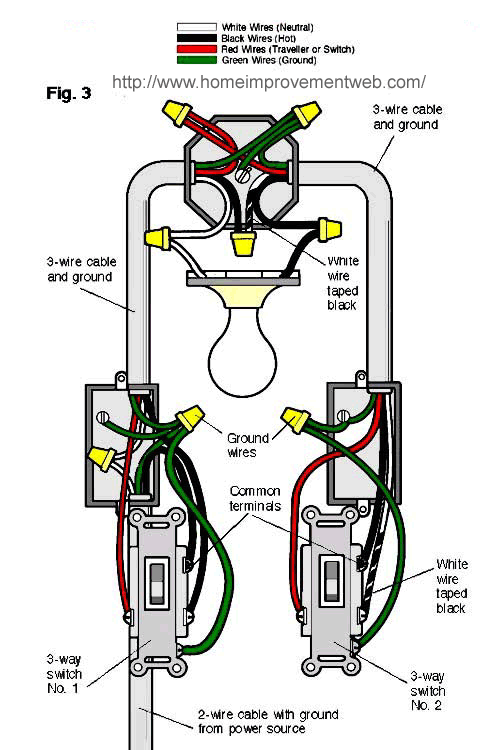
This diagram somewhat explains how the 3-way switch is wired.


This one shows how the wiring should go. Since the motion sensor switch is missing a traveler, the switches won't work as they should...