Sunday, January 31, 2010

Closing Up The Walls

The electricians made as few holes in the walls as possible, and the holes were made as small as possible. I started closing up a few of them this weekend. Who knew it'd take so much work! All the previous plaster work I did was to close up small holes that still had lathe behind them. These holes were cut all the way through! If I was lucky, a stud or something else solid was there so I could secure the new lathe to it. I haven't been unlucky yet, but that's because I haven't started working on any other holes yet!

There were a few different methods and suggestions posed about approaching this.
  1. I could cut some lathe, secure it, then start laying the plaster over it.
  2. I could cut some dry wall, secure it, then use plaster and tape to seal it.
  3. I could cut some plywood bigger than the hole, secure it to the plaster, then fill the space with plaster.
Given that none of the holes were really all that big, and the drywall was already 1/4 inch thick (the same thickness as the plaster already on the walls), I decided to cut lathe and plaster the walls.

I started by cutting the holes larger, so the edges were even. I didn't have a chisel, so I had to use the end of the hammer. I cut the lathe for the openings next then attached them. It was pretty difficult because I wanted to make sure the switch box was level. In the end, I used the lathe for the box to rest on. It's still not completely level, though. It's a little upsetting. I did one layer on Saturday, making sure I pushed the plaster through the holes in the lathe to create the keys to hold everything in place. Today, I added a second layer to it, which really evened it out. I think one more layer should complete it. Each layer has the fiberglass tape over it. I hope this adds some security and strength to the opening.

Here's the living room light switch opening.


This is after two layers of plaster with the lathe replaced on the bottom part. It's got some fiberglass on it so the next layer can grip.


I lathed and plastered the light switch opening and the hole in the ceiling above it. Neither one is completely finished. They'll both probably require three layers of plaster. I attached the lathe to the other two openings in the ceiling. I needed a smaller putty knife to finish the job, or a chisel to widen the opening. I'm going to opt for the smaller putty knife.


These two have the lathe so far. No plaster has been applied due to lack of time.


This is actually a lot more work than I thought it would be!

Saturday, January 30, 2010

Craigslist>Free (Part 3)

Craigslist comes through once again! It's been hard to actually get anything off Craigslist>Free lately, but this weekend, I came up!

I picked up this tv stand this morning.


Later in the day, I got a hit on a glass table/desk.

It's pretty big. It looks like it could fit two computers! This was from a Marine who re-enlisted into the Army Special Forces. Seemed like a good guy; I hope everything goes well out there.

The Changing Chandelier

Granted the new chandelier doesn't really look like anything spectacular, I still thought it'd be better to un-shine it before hanging it. Sandra and I looked at metal paints to try to figure out what to use. Here's how it looked before we started:


We picked up a can of Knocked Brown metal spray paint. We were worried that the paint wouldn't stick to the light at all, but it did with some difficulty. Sandra spray painted while I was working on something else. It was clear after one coat that a second would be required. Here's what it looked like after one coat:

You can't tell at all from the picture, but specks of gold were still showing through the brown. One more coat will be necessary.

Thursday, January 28, 2010

lights, Lights, LIGHTS! (Part 2)

We went to Universal Lighting after work yesterday to pick up the lights. Apparently, they close at 5 PM, so having arrived at 4:40 PM, we were a little pressed for time. Jackie helped us choose the lights we needed.

For the front of the house, we had decided on two stylized lights as opposed to flood lights.

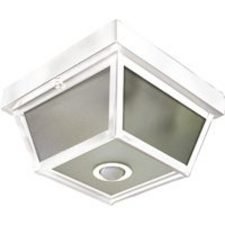
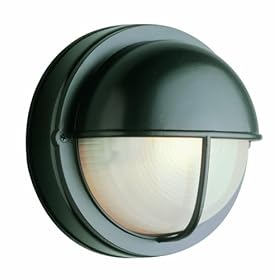
We were trying to decide between the black and the white. The black had a fluorescent bulb in it,and the white had an incandescent. The screen on the black had more of an opaque finish, so we decided on the white, since the trim on the house is white, and the screen, although finished, was clearer. Jackie went up to grab them from the stock, and it turned out there was only one! He offered us the display model, and we took it. He was unable to dismantle it on the spot since they were closing so soon, though. I'll have to pick it up today.

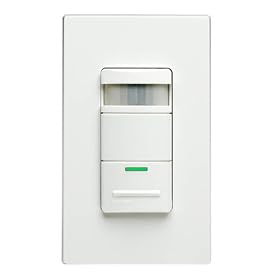
I called Harry from Hai Lin Electric to make sure it was possible to put a motion sensor on the circuit with the two front light; he said it was. I picked up a motion sensor to go with the front lights.

For the backyard, I decided that a motion sensor light wasn't really necessary, however, the 300 watt light was only $20 here. I picked up the black 300 watt motion sensor light.

The entryway light fixture currently has a cracked casing. We also decided to get a motion sensor light placed here. I found this one on Amazon for $35:

I know it was also at Universal Electric, so I decided to wait to do a price comparison; it ended up being about $15 cheaper on Amazon. We'll see if there are any shipping and handling fees that would even it out.

Wednesday, January 27, 2010

Changing the Chandelier

The dining room has this really atrocious 70's styled, weighted, pull-down, push-up light. It's horrible. I've been Craigslisting>Free in hopes that someone can save me from that abomination. This week, someone came through! I just picked up an 80's styled cubist, brass chandelier! It's really dirty, but I think with some cleaning and possibly some paint, it'll look decent enough that I can leave it there for a few years/months!

Old Light, Say, "Hi," to New Light!

lights, Lights, LIGHTS!

I guess there's pretty much a something out there for everything and everyone, huh? It's so hard to decide on light fixtures.

I have to get lights for the backyard, since right now it's just dark at night. I can't believe there were never any lights installed back there! The decision, as seems to be normal, includes a menagerie of factors seemingly unrelated to just having a light there.

Factors:
  1. Color or the fixture
  2. Wattage of the lights
  3. Height of the fixture
  4. Motion Sensor or not
  5. Where to place the switch? (Kitchen or back room)
  6. What brand of light to get?
  7. What do the reviews say on the light?
  8. If it's a motion sensor light, should the motion sensor override the "Off" position of the switch?
  9. If it's a motion sensor light, should the "On" position of the switch override the timer?
  10. How much are replacement bulbs?
  11. How often do the bulbs blow out?
  12. What's the coverage area of the motion sensor? (150, 180, 220, or 270 degrees)
  13. How accurately can you set the sensitivity of the motion sensor?
A trip to Universal Lighting was all kinds of no help. They have no prices listed on their products, and it's impossible to get someone to help you. Apparently, you have to be a contractor to get taken care of . We finally took some items to the front desk and got a price check. We thought one of the lights was cheaper at Home Depot, so we decided to go check it out over there. It turned out not to be cheaper, so we're making another trip to Universal Lighting today. Harry from Hai Lin Electric is supposed to meet us there, so we can get his advise on things.

We want to get a motion sensor light for the from foyer, between the gate and the doors. We found one at Universal Lighting that they're selling for $50.
Amazon has the same light for $35. We're going to order from Amazon.

The front of the house is also really dark at night. We considered placing one flood light above the garage, but we decided that it would look really ugly. Two smaller lights on the sides of the garage would be more aesthetically pleasing, so we're also looking for lights to put there.

I found these two on Amazon:
I like this one better

This one would serve its function, and it's $7 cheaper.


As with everything else, we'll go back to Universal Electric to check out what they have and price check. If we can get something that doesn't need to be shipped, then that's better.

Tuesday, January 26, 2010

What A Difference!

The recessed lights got installed yesterday. They look awesome! The Post-It room diagram, along with post-its on the ceiling really helped. Thanks to Yelp and Harry Lin with Hai Lin Electric. These guys did a great job! They kept the mess to a minimum, and made as few and small holes in the walls as possible. I'll be able to patch up the holes without much trouble!

From the Hallway:

Before:
After:

This one really shows how well the spacing of the lights illuminates the room since it was dark out.


From the Dining Room:

This one shows the pattern we decided on. It really matches the drawing!

Monday, January 25, 2010

It's Raining; It's Pouring...


This is how hard it was raining when we left the house. I later stepped out of the car into a river.

Sunday, January 24, 2010

What's the Circumference of the Penumbra of the Recessed Lights?

Geez, I wished I had asked that last Friday! The electricians were coming in tomorrow to install the recessed lights. I'm supposed to mark the spaces on the ceiling where the lights are to be installed, or leave a map for them. Sandra and I literally spent two hours sticking
and resticking post-it's to the ceiling to see what the light pattern would look like.

The things we were considering were:
How would the set-up look overall?
Would it provide enough light for the room as a whole?
Would it provide enough light to each section of the room?
Is it functional to place a light there?
Is it aesthetically pleasing to place a light there?
Should they all line up a certain way?
How far from the wall should they be?
How far from each other should they be?
The ceiling's 10' high. What would be the umbra and penumbra of the lighting cone from that distance?
Where should the switch be? Should the switches both have dimmers?
Is it necessary to have three switches - one for one of the outlets?
Based on the dimensions of the room, if we placed them evenly into two rows of three, how would it look?
Should each pair (front and back of the room) be on the same plane?
Should each set of three (front three, back three) be on the same plane?

Sandra diligently helped me take notes as I read off measurements, and in the end, here's what we got:


There's about 72" between the front row and the back row.

We left that Post-It, along with 6 on the ceiling where each light should be for the electricians. Each Post-It on the ceiling had the distance to either side (wall or light) with arrows pointing out the direction. I really hope it's clear enough for them! They're supposed to be in tomorrow. I'll stop by after work to check it out!

"Space By The Lamp!"

Only my sisters will understand that the title of this post relates to the heater. My mom's house has a heating vent in the living room by the lamp, and every time it was turning on, someone would call it, so they could lay by it and warm up.

A few weeks ago, we walked into my house and noticed it was REALLY hot in there. It seemed like the heater had been left on all day! I looked at the thermostat, and it should have been off, but it was on. Odd. I contacted the contractor, and he said he didn't have the heater on at all, but would come by to check on things to make sure nothing was wrong.

The next day, he told me it was broken (duh). I disconnected it from the wall, and patched up the giant hole. The two black and black wires still stuck out.

On a trip to Home Depot, I decided to pick up a thermostat. There are a TON of thermostats! 5 and 2 days, 5-1-1 days, 7 days, with an atomic clock, with the outside temperature, lighted, digital, old school (twist), etc. They ranged from $20 to $90. I decided to get something simple and cheap. The $30 Honeywell looked fine.


It was digital, programmable, and didn't seem to be too complicated. I took it home, opened it up, and there were FIVE slots for wires! I guess because this also worked for places with air conditioners, it had hot and cold settings. What made things even more complicated, my old thermostat was labeled Y and O. This one had a Y, but no O. It had an Rc, Rh, W, Y, and C. The Rc and Rh were connected by a jumper. Why? The instructions didn't elaborate. I tried hot tapping them, but because the voltage was so low, there was no immediate reaction! Great. I decided to leave it alone until I could drill the holes necessary to mount the thermostat.

My Uncle came over today with a concrete drill for the plaster. We marked the holes, drilled them in, and mounted the thermostat. Oops. I forgot to look up the wiring! We tried a few things, none of it worked. Googling on our phones was difficult to read, so we just left to go eat. I looked it up on-line at my mom's house, and found this blog. R and W were the wires I needed to connect, he said.

I drove over to the house, connected the R and W, closed up the unit, and turned on the heat. Within seconds, the heater turned on!

Saturday, January 23, 2010

Patience is Key?

Maybe not, but Home Depot sure needs some training on how to cut keys!

Trip #1: Last Thursday, while I was at Home Depot picking up some stuff, I decided to stop at the key cutter to get a set made for Lisa. I handed the guy two keys (my door and the gate). I told him I wanted the gate one in the same color (silver), and the house key in the Giants key. He said OK, grabbed the keys, shuffled some stuff around, inserted the keys, pushed some buttons, sanded them down, then handed them to me. Sweet, I thought. Now I have a Giants house key!

I get to the house, test the gate key - nothing. Opened the gate, tested the Giants key. Nothing. WTF!? So, I tested the Giants key on the gate - it worked? Tested what should've been the gate key on the door - nothing. Ok. The guy messed them up. It's all right, right? I'll go back and have them redo it.

Trip #2: This morning, I went back to have them recut the keys. I explain to the greeter what happened, and he said I could just go to the key cutter and have them redone. I explain to him what I wanted, how it differed from what I got, and he redid it. Cool. It should work now, right? Home Depot had some foam spray, so I picked that up on the way out. Got home, tested the keys - neither of them worked! Whatever.

Trip #3: We stopped back at Home Depot on the way to get Sandra's car from the shop. I explained to the guy again what happened, and he recut the keys. This guy, though, said that I probably had old tumblers and needed to get the lock rekeyed. I told him it had just been rekeyed, and this is why I wanted more keys. He said maybe the original was old. I reiterated that the lock had just been rekeyed, so the original was brand new, too. Anywho, none of these keys worked either!!!

Trip #4: We go back to Home Depot, there's a younger guy at the key cutting machine. He says maybe my keys just can't get copied. Asked if I'd ever copied them before, and I said yes, and they worked - the first time. He said if it didn't work after this, then I should just return them. He made the Giants door key, a second silver door key, and a gate key. I got back home, and big surprise - none of them worked!

Trip #5: We went back to Home Depot, the greeter asked how the keys worked out. I explained to him that I'd returned to the store twice since I saw him in the morning, since they didn't work. He apologized and said his Giants key didn't work too great either. I said none of them worked great, except the first one that was cut to the wrong key. He said I should just do a return, which I did.

Time to go to Great Wall Hardware to get Lisa's keys made...

Problem with Paint

Last Sunday, Home Depot was having a mail in rebate special with their paint. I decided that I might as well get all the paint I needed - 1 gallon of semi-gloss in the baby blue for the bathroom, and 5 gallons of tan in egg shell for the rest of the house. I told the guy. He said, "ok." I asked if he needed me to write it down. He said he'd remember.

We walked around the store for a bit, since I had to pick up a brush to scrub the fireplace and a spray bottle. Returned about 15 minutes later, and the colors all looked really light. Apparently he didn't dry them, but said he could do that if we wanted to see what it would look like. I asked him to do so, and the colors did get a bit darker once dried. We put all the cans in the shopping cart, checked out, and dropped them off at the house.

Fast forward to today. Mr. Ramirez came over to check on things. He looked at the paint and said, "Why'd you get so much semi-gloss?" I was like, "Whaaaaat?! It should be 5 gallons of egg shell." He goes, "Not according to the cans. Come here, look!" Crap. He was right. And they were labeled non-returnable!

Later in the day, I called Home Depot. I explained to the paint guy what happened, and he said, "Do you remember who helped you? What he looked like?" I said,"Asian, kinda big, ear plugs..." He goes, "Mikey. He'll be in tomorrow. Take it up with him then, or you can speak to a manager now, if you'd like?" I told him I'd rather take care of this now, and he transferred me to Roberto.

I explained to him that I had 5 gallons of paint in semi-gloss that was supposed to be egg shell. He asked if it was a light or dark color. I said it was pretty light. He said I could go ahead and bring it in to return it!

I returned the paint successfully, but was way too frustrated with Home Depot to wait around for them to mix more paint. It was the fourth time I was there today!

Fun with Foam

I bought a can of expanding foam sealer from Home Depot since it was on sale. I knew of a few places I could use it.


I ended up spraying the foam to seal the outside wall in the bathroom, where some pipes went out, in the bedroom closets, where some water pipes went up, in the kitchen where the pipes went into the walls, in the laundry room where the pipes came out, and in one of the storage rooms because I had to use it all up!

It wasn't expanding as fast as I remembered it would, so I sprayed an ample amount to each area to ensure coverage. About fifteen minutes later, I had ginormous foam bubbles where there were once holes! At least it's now sealed!

As usual, I didn't wear gloves. After I finished with this project, my hands were extremely sticky, I had little pieces of foam stuck to my shirt, and I couldn't wash it off!

Friday, January 22, 2010

Craigslist>Free (Part 2)

Picked up a lighted glass display case from Citrix Tattoo shop on 17th Street! For some reason, nothing else has been hitting. :-/ I've gotten some pretty nice stuff off Craigslist>Free so far. Hopefully it still holds up!

Sunday, January 17, 2010

Follow the Red Brick Fireplace...

If it was up to me, the fireplace would get painted. Unfortunately (or fortunately), Sandra's been telling me otherwise. I got some Oxyclean and mixed a whole lot with a little bit of water. This made a pasty Oxyclean mixture that I smeared onto the front of the bricks. The recommendation on the Oxyclean container is to let it sit for a few hours before rinsing, so we went to Home Depot to get a brush and a spray bottle to clean it off. I picked up a grill cleaning brush with brass bristles to scrub the Oxyclean mixture off. It took about 45 minutes to wet down and apply, two hours to sit, and about 3 hours to scrub clean. I wanted to make sure all the chemicals were off the brick.

Here are the before, during, and after photos.

BEFORE:


DURING:


AFTER:

Saturday, January 16, 2010

Let There Be Light! (Part 3)

After some Googling, I found that there are no dual pole, 3-way switches made by that company! Some are advertised as such, but Amazon reviews have said that there are only three wires +, -, and Ground. The real 3-way, dual pole switches would require two travelers, the hot, and the ground.

I called Lowe's, and the person I spoke with on the phone said they did have some 3-way, dual pole motion sensor light switches. I mentioned that I had purchased the single pole one, and she said, "That happens all the time. You can return it after you install the right now, if you want." Cool, I thought, then headed out to Lowe's. They didn't have the correct switch on the shelves where everything was, so I asked one of the employees. He walked off with the one I had picked up off the shelf to look into it. About five minutes later, he returned with, "I don't think we carry it." Great. I just drove out here for nothing!

On the way back to SF, we stopped at Home Depot, cuz that's how we do. Home Depot did have a 3-way, dual pole motion sensor light switch. It was made by Leviton.

I asked the employee behind me if I could open it up, and he said, "Go ahead." It was exactly what I needed! It had two travelers, the hot, and a ground! Oddly enough, though, it didn't come with a plate. So, me being me, I didn't buy it. I figured I could find one with a plate on Amazon.

Sandra talked some sense into me that night, and I went back Saturday to pick it up. Installation took about 15 minutes, since I was playing with the travelers to make sure the upstairs light switch would be on in the up position (and off in the down position), and that both switches would work. The instructions look like this, so I just decided to hot tap the wires, since they are all black! What's weird, though, is that the upstairs switch won't turn the light on if the downstairs switch is in the off position. It seems like this wasn't ever wired correctly in the first place! It works. Upstairs will be on, downstairs will be on Auto, and the light will turn on when the door opens, and off 5 minutes after no one walks by.

Open the door, and Let there be light!

Monday, January 11, 2010

Craigslist>Free

Everyone's had to have heard about the guy who sold his life on Ebay, but has anyone ever heard of furnishing a house on Craigslist? Moving in to a house requires a lot of things that I don't have - like tables, chairs, shelves, etc. To get started, I decided to look under Craigslist>Free and >Furniture to acquire the necessities frugally.

So far, here's what I've gotten from Craigslist:
  • Dining Table, leaf, 5 chairs - $60 (picked up near State)
  • Hallway Table - Free (Picked up on 48th and Balboa)
  • Coffee table and matching end table - $20 (Picked up near CPMC)
  • 7 full sheets of drywall - Free (Picked up on 30th and Ulloa)
  • 7 ft Slanted Shelf - Free (Picked up in DC)
  • 6 ft Shelves (2) - Free (Picked up on 2nd and Howard)

Let There Be Light (Part 2)

I noticed that when I get to the house at night, I'm always smacking the wall to find the light switch. Why can't there be something that just turns on when I open the door? Zing! Rewind to last Friday's trip to Lowe's to price check tiles and shower head sets. We're walking down the electrical aisle, and I see light switches. I know I have to change a few of them (they dim on their own when you hit the wall), but could I replace the entryway switch with a motion detector switch?

As usual, things aren't easy. They have motion detector switches that have On, Off, and Auto settings, switches with no settings, switches with auto and off, switches that cover 180 degrees and some that cover 150 degrees. Then, they all come in white and "neutral." I'm walking down the aisle to see what else there is in this style, and I see some three-way switches. "These two way switches are monogamous, I thought, and these three way swiches, 'Get down!' What's the difference? How can a switch go three ways? On and off, right?" Without asking, I get the two way switch (single pole). The one shown below is a three way switch.


We get to the house, eat, unload everything, and I start pulling off the old switch. The breaker's off for the front, and as I unscrew it all off, I realize how dark it is! I couldn't read the back of the switch to tell what was positive, negative, or ground. Oh well, I'll come back on Sunday to finish.

Sunday, we arrive, and Serge, P, and Natalie are over to help, too. P's checking out the back of the switch, and it doesn't specify what's positive, negative, or ground. It just has a common label on one side. And, all the wires are a solid black!

Apparently, this is how three way switches are:


We tried connecting the ground to the common, then the other two black ones randomly, hit the breaker - nothing. Swapped the black ones - nothing. Swapped them again - nothing. Great. This time, I disconnected everything and hit the breaker. Holding the two black wires, I tapped the black wires coming from the wall. Top two - nothing. Left top, bottom - zzzzzzzzzzzzttt!! Light turned on! Right top, bottom - zzzzzzzzttt!! Light turned on! Wtf? They both do it. So I connected the ground to the top left, then the black, one to the top right and the bottom. Everything worked fine (on this switch!). I put all the wires back into the wall, screwed it shut, tested it out, and it worked! Sweeeeeet! The instructions say to connect the ground to the mounting plate - why?

I got back home and googled the instalation of a motion sensor. Let's just say It's wrong, even though it works, and I now know what a three way switch is for! We'll be revisiting this once I exchange the switch for a three way!

The Tile Drama

If I were to ask you how much tile was in your bathroom, would you know? Would you know what color is it? How much square footage you have, how much bullnose you have (what bullnose is), or if there are "accent" tiles anywhere? I feel like once this is all said and done, I will.

It all started when I was at the house the last weekend dropping off the vanity I drove 45 miles to get from a Home Depot that had it in stock. The exorbitant amount of shipping and handling ($139 for a $240 vanity) motivated me to find one locally and go get it. I called ahead, and he said there was ONE on the shelf, and he'd put my name on it. When we got there, there was a home depot piece of paper that said ROB. I was pleased. Anywho, this does relate, I promise. We brought the vanity back from Santa Clara, Sandra helped me load it into the house. Excited, I took out the counter top to see how it'd look in the bathroom. Then, I realized that there was no splash guard! First, I thought it'd be fine; we could find some 36" x 3" splash guard from Home Depot, or get some granite to put behind it. To be safe, I asked the contractor. His response - the wall tiles will cover it, and it'd be fine without a splash guard. My reaction - what wall tiles?!?

Apparently, to properly water proof the walls and such, I need about 4 feet of wall tiles to go around the uncovered walls. Luckily, it's only 13 feet (55 square feet). I pretty much knew what I wanted to do immediately - all white with a brick pattern!

Tuesday, we made a trip to Home Depot. I laid out all the tiles on the floor in the pattern I liked - 3' of 6"x8", 1' of 3"x6", and the bullnose, I don't know. Sandra grabbed a patterned one that was kind of molded and shaped. It looked good. I figured I'd let the idea marinate and return to it on the weekend.

I tell my co-worker about how I had to now choose tiles, and she had the same thought I did - all white "subway" tiles! Now I knew it'd be fine!

Friday, we go price comparing with a few of the tile shops on Bayshore. They didn't have all the tiles I wanted to complete the pattern, and the glossy white tiles in 3x6 were a dollar or more over the price at Home Depot! We ended the night deciding to go to Home Depot on Saturday to buy everything...

Saturday rolls around, and we get to Home Depot. This was a long trip. I laid out the tiles on the long bed cart in the pattern I thought would look good. I ended up using a 1/4" x 6" all brown band between the 3"x6" and the 2"x6" bullnose. It looked good. After a little debate about 1' of 3x6 vs 6" of 3x6, we went with the 6". (Sandra changed her mind later to agree with the 1'.)

With a small degree of difficulty, we calculated how many boxes of each we need, and pulled out the necessary boxes of each tile. As I started to put the tiles that I laid down away, I noticed something - the finish on the 6x8 was different from the finish on the 3x6!!! It was a pretty huge difference, too! One had a flat finish while the other was really glossy! Why would they only stock the 6x8's like that?! It wasn't like this on Tuesday, was it? We found the glossy white 6x8 tiles, and the SKU number was the same as the flat white tile! To make matters worse, we couldn't find the difference on the boxes! I started asking around to a few Home Depot employees, and they couldn't figure it out. Sandra, who stayed in the aisle, found that the glossy tiles had a square cut out on the top corner of the box! The Home Depot employee helping us (Dennis), reached deep into the shelves and pulled out the 4 boxes of glossy white tiles that we needed! Apparently, the lack of distinction was pretty major. Dennis called someone in management over, and she was studying the tiles and making notes. Later, we found a few Home Depot employees over by the tiles deep in discussion about the glossy vs flat white 6x8 tiles!

We finally got all the tiles, though. Hopefully it's enough!

Sunday, January 10, 2010

Let There Be Light!

I went to the house last night to cap off the grounded traveler wire. It went fine. From everything I could find, no one really makes a legit 3-way motion sensor switch that has two travelers, a common, and a ground! Seems like there would be a huge market for this item, since a lot of people on-line are looking for one.

For now, the bottom switch, while set to auto, will turn on when the door's opened, or when someone walks down the stairs, and when the switch is set to, "On." It'll also turn off the light if the upstairs switch is set to, "On."

The top switch will turn off the light if it is set to on, but it will not turn it on if it is set to off. It will turn it on if it's set to, "auto," though.

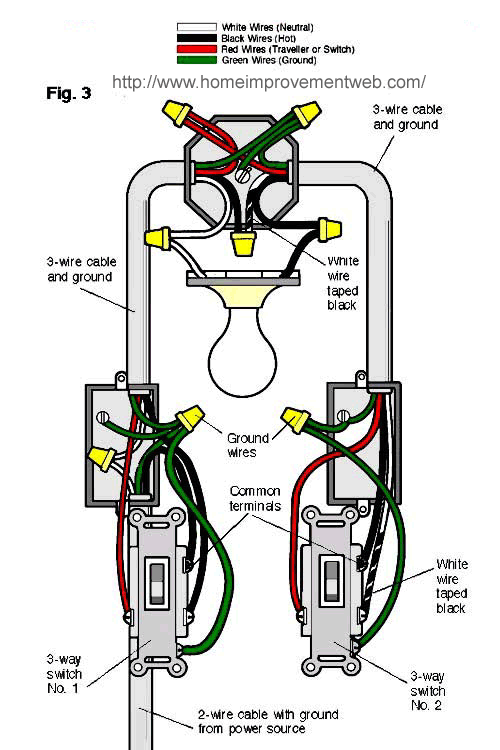
This diagram somewhat explains how the 3-way switch is wired.


This one shows how the wiring should go. Since the motion sensor switch is missing a traveler, the switches won't work as they should...

Thursday, January 7, 2010

bathtubs, Bathtubs, BATHTUBS!

They're all the same, right? You turn on the water, watch it fill, slink down into it, and feel the heat relax you after a long day of work or a hard workout... right?!

Wrong.

Bathtubs come in all shapes and sizes, and they definitely do not make them like they used to. Most older tubs, as I've come to find out, are cast-iron. Now, companies have everything from acrylic to fiberglass to porcelain enameled steel to cast iron to something they created (see Americast, here), OR any mixture of the above!! WHAT?! And to make matter worse, it's hard to find the size you need or want in the material you'd like, with the waste overflow depth that'll keep you submerged! Why? Why all this madness? Why can't there just be a 60" x 30" tub that's 14" high, one that's 17" high, one that's 21" high, then have each of those three heights made in cast iron, acrylic, fiberglass, or steel. Then, each company could make the same 12 tubs in 72" x 30" and 66" x 30." Done. 36 tubs, all fit anyone's tastes. Why is this so difficult? Why don't catalogs have everything sorted out like this?

To make things worse, no one asks you, "Do you want a tub that you can use and will last you forever?" They ask you questions like, "Do you want a warm or cold tub?" "Do you want a colored tub?" "Do you plan on using the tub?" Well COME ON! If I wasn't planning on using the tub, I wouldn't be here looking for one!

I've thought three times now, that I found "the" tub, only to have had my hopes dashed, three times now.

The first one was the cast iron Kohler Villager - turns out, you have less than 9 inches of water before it starts to overflow.

The next one was the American Standard New Solar - it's so new that no one carries it! And, it's just porcelain on steel. Supposedly, it's steel isn't great material.


The third one was actually ordered then vetoed by the contractor. It's the American Standard Princeton. It's made of Americast, which as I was told, is pretty much plastic. With a little Googling, I found that extended periods of high temperatures (not defined) do cause this material to warp! It's so bad that American Standard had to do a recall on sinks made of this material.

Great. 3 bathtubs that had the potential to be awesome have all been smashed. What now?